Tuesday, December 29, 2015

Off the Needles: Last *Finished* Knitting Project of 2015


Since there are only 2 more days left in 2015, I think I'm safe in saying that this will be the last knitted item that actually gets finished this year. (I have several that I've finished the knitting part, but still need to do the sewing part...the part I always put off as long as I can.)

A friend of mine gave me her stash of yarn and other knitting stuff saying, "I realize I'll never be a knitter." Given her age (mid-to-late 70s) and all the other things going on in her life, I think she's right, and I salute her for accepting reality (unlike some of us who believe we'll live long enough to take up every craft that's ever interested us).

I felt that although she would never own anything she had personally knitted, she still deserved to have something from her effort to take up knitting. Looking through her donated stash, I found 3 skeins of wool that seemed sufficient to make a scarf. The yarn, Emu Naturally Double Knit, is a discontinued 100% wool yarn from England in a heathery oatmeal color. The yarn has a rather rough texture (or maybe I'm just being overly sensitive) so I hope hand washing will soften the fibers.

The pattern I used was "Diagonal Ribbing" from Barbara G. Walker's Learn-to-Knit Afghan Book (Charles Scribner's Sons, 1974, pp. 45-46). It's a 16-row repeat pattern that works up quickly as it is primarily combinations of pairs of knit stitches and pairs of purl stitches and is completely reversable. I made it about two and half yards long, using up all but a few inches of the 3 skeins. (Interestingly, it is not the same pattern as one with the same name in Walker's A Treasury of Knitting Patterns.)

All that's left to do is sew in the tails and give the scarf a washing and blocking. Hope she enjoys using it when our weather finally turns cold.

Wednesday, November 11, 2015

Two Baby Blankets Awaiting Nephew


A few weeks ago, a knitter friend and I took part in our area's Yarn Crawl. As knitters we are blessed with an embarrassment of riches with no less than eight yarn shops within easy driving distance. We quit our tour after the fourth shop, but not before I had done some damage to my credit card and made some increase in my yarn stash. Fortunately, I had plans for much of what I bought and decided this week to put some of the yarn to use.

My niece and nephew are expecting their first baby in January so finally I have a relative to make baby things for as well as for those babies at charities that my knitting group donates to.

So far, I've finished two baby blankets.

Knitted Blanket


This one is knitted out of three skeins of Plymouth's "Encore Colorspun" worsted weight in colorway #7659 "Grape Ombre." The pattern is Lion Brand Yarn's "Knit Diagonal Pattern Baby Blanket," a free pattern on their website. I especially like this pattern because if you're not sure how much yarn you need for the blanket you just divide what you have in half, knit the first half of the pattern's increases, then knit the second half of the pattern's decreases. I used my scale to determine when I had used up half the yarn so I would have enough to finish the piece.


I still had some yarn left so I crocheted a scalloped edging. The pattern is "Shell Edge" from 150 Crochet Trims by Susan Smith (St. Martin's Griffin, 2007, pg. 48). I like adding a crocheted border to a knitted piece as it helps to stabilize the edges and to keep the piece's shape. Of course, the edges on a garter stitched item usually behave and don't roll like stockinette does so this time the crocheted edging was mostly to add a bit of interest to an otherwise simple square.

Crocheted Blanket


The other blanket is crocheted using Plymouth's "Encore Colorspun" worsted weight in colorway #7722 "Very Bright Kids." Do you see a pattern here? Encore is my goto yarn when I need the easy care of acrylic but want the yarn a bit nicer than 100% acrylic. Encore is 75% acrylic and 25% wool and is machine washable and dryable, making it perfect for baby things. And I think the wool softens the feel of the yarn.

The pattern is a simple one of rows of double stitches with occasional chain skips to create holes in the middle of three rows. The completed blanket is approximately 36" by 36".


Here's my pattern info (I realize since I'm not a professional crochet designer, some instructions might confuse...feel free to ask me to clarify anything):

In my example the number of stitches I used are multiples of 12 plus 10 more stitches plus 3 stitches for beginning row 1. For my blanket I chained enough stitches to have 94 stitches on each row, plus I included 3 extra chains to begin the first row of double stitches.

Row 1: ds in 4th chain from the hook and ds in all the remaining stitches, chain 3, turn.

Row 2: ds in stitches 2-10, skip 2 stitches, chain 2. Continue 10 ds, skip 2, ch 2, ending with 10 ds. Chain 3, turn. This results in 7 holes separated by groups of 10 ds.

Row 3: ds in stitches 2-10, 2 ds over previous row's ch 2. This closes the hole you made in row 2. Continue in this fashion to the end, chain 3, turn.

Repeat Rows 1-3 to desired length.

You can be as flexible as you like: put more solid rows between the hole rows, put more stitches between holes, put fewer stitches between holes, put holes randomly through the piece, etc.

Thursday, November 5, 2015

Off the Needles: Grey and Silver Dropped Stitch Scarf


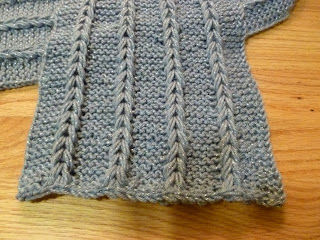
I'm back to working on non-State Fair projects. While working on another scarf that didn't quite turn out the way I wanted, I learned this design technique. Putting aside the disappointing project for a later time, I knitted this scarf to incorporate this interesting ribbing design. 

The mid-weight (sport? DK?) grey and silver yarn is Studio Samples by Nicole purchased at A. C. Moore and the fiber listed on the label is "mixed fibers"... probably the grey is acrylic with polyester silver thread adding sparkle. I used five 50-gram balls of the yarn for my scarf.

The scarf is knit in garter stitch with some of the stitches dropped on the last row, and then picked back up with a crochet hook in a fashion similar to making a crocheted chain. After all the dropped stitches are chained and back on the needles, the last row is bound off as usual.


I cast on 37 stitches using the long tail cast on method. 
For the first stitch of each row: move yarn to front, slip 1 stitch as if to purl, move yarn to back, and knit to the end of the row. This gives the sides of the scarf a smooth, neat edge. Continue this pattern to the desired length. 

For the last row (knit 5 stitches, drop 3 stitches from the needle) 5 times, and then knit the last 5 stitches. Pull the dropped stitches all the way to the beginning of the piece so that you have wide strands of yarn separated by the columns of garter stitch. The dropped stitches will be chained up to meet the stitches remaining on the needle. The dropped stitches are worked in groups of 4 with just the first 4 given a half twist before being chained to the next 4 strands.

The result is a thick line of V-shaped stitches lying against a garter stitch background that makes for a more interesting scarf than simple garter stitch.


Saturday, October 17, 2015

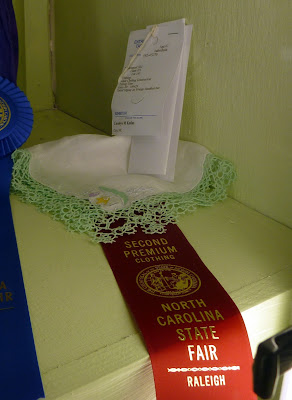
My 2015 NC State Fair Wins

This year I entered nine items in the 2015 North Carolina State Fair. Today I went with my daughter to see how I did. What an exciting experience! Six of my entries won ribbons.

Blue Ribbons (1st place)


Knitted edging on tea towel (my first time entering a knitted piece)


Red Ribbons (2nd place)


Crocheted baby sweater (first time entering a sweater/crocheted)


White Ribbon (3rd place)

Crocheted shawl with beads (first time entering a shawl/crocheted)


Thursday, October 15, 2015

Shuttle Cleaning


I spent some time this week cleaning off tatting shuttles so I could start new projects. Usually, I just run off lines of picot flowers to glue onto paper bookmarks as a way to clear off a shuttle, but this time I decided instead to see how many hearts I could squeeze out of the short lengths still left on the shuttles. I managed 15 using Rosemarie Peel's heart pattern. I love this pattern because it's almost all chains so you don't need much thread on the shuttle.

I must have overdone the "pinch" in the process because the next day I woke up with the tip of my left thumb a bit numb. I'm taking a break from tatting to give my thumb a rest.

I'll glue these hearts onto cards and send them to friends on Valentine's Day next year.

Thursday, October 8, 2015

2015 NC State Fair Entries Submitted

Today I entered all my pieces for judging in the 2015 North Carolina State Fair. It was almost an anticlimactic moment for me after all the last minute work to get everything ready. Now I just wait until the fair opens to see the judges' results.

To recap, here's all I entered:

Knitted Shawl


Crocheted Shawl


Crocheted Baby Sweater


Knitted Edging


Tatted Edging on Handkerchief


Tatted Edging on Pillow Case


Framed Tatted Piece


Tatted Edging on Metal Trivet


Tatted Brooch

Monday, September 28, 2015

2015 State Fair Projects: Crocheted Baby Sweater


At last! I finished my final entry for the 2015 North Carolina State Fair -- a crocheted baby sweater. This is a pattern that I've made several times before. It was originally published by Doreen Knitting Books, Volume 100, in 1950 and is available in several places on the Web. It works up pretty fast and there are only two underarm seams to sew up. 

I used some thin yarn from my stash. No labels so I have no idea of the manufacturer any more. Burn test indicated it's wool or some other animal fiber. There were small amounts of four shades of yellow and orange. Because the yarn is thin, I used two strands throughout and created on ombre effect by gradually blending the yarns from solid yellow to solid orange. 


The original pattern calls for a threaded ribbon closure, but I added a loop and this cute button that went well with the colors.


This and the crocheted shawl I posted earlier are my first crocheted entries so it will be interesting to see how I fare against the other entries. I am a bit concerned about the armhole seams in this piece as there were a lot of yarn tails to be dealt with due to all the color changes. I think I'll probably lose points because of the inside appearance so I'm still thinking if there's a way to conceal the little fuzzy ends better. I haven't washed the sweater yet so that might improve the situation. 

I look at the whole entering handwork in the fair experience as a way of challenging myself to (1) finish something on a deadline, (2) work within constraints set by others, (3) practice problem solving when I go beyond the boundaries of an established pattern, (4) see how my skills compare with others using the same techniques.

This time next month I'll know how my work compared with others, For now, it's great to be finished with everything so I can get back to some other projects that I've put on hold. 

Sunday, September 27, 2015

Off the Shuttle: More Tatted Paper


More tatting on paper shapes completed. These can be quite addictive and, for me, one of the few things I can tat during demonstrations without screwing up. I plan to attach them to cards and mail to some friends who are going through some bad medical issues.


2015 State Fair Projects: Crocheted Shawl with Beads

One of my proposed entries for the State Fair was to be a crocheted shawl. I have a skein of yarn of beige, tan, dark brown that I've wanted to make into a scarf or shawl with gold beads. I love the combination of colors and the feel of the yarn; however, more than halfway through my work on it I realized that it was going to be too small to be a shawl. The amount of yarn I had would make a crocheted scarf or a knitted shawl, but definitely not a decent size crocheted shawl. So I needed to make a decision: don't enter a crocheted shawl at all or find some other yarn to make into a shawl. Since there are still a couple of weeks left before entries need to be turned in, I decided to go ahead and find another way to complete the project.

Going through my stash I found several balls of ribbon yarn that I'd acquired from another knitter's destashing. This is Artful Yarns' "Celebrity" -- a discontinued ribbon yarn that's a mix of 40% polyester, 30% acrylic, and 22% nylon. The color is colorway #35, a blend of purple, cream, yellow, light olive green, and brown. I haven't had much experience knitting ribbon yarn, beyond a couple of simple garter-stitch scarves back when "railroad" yarn was the rage several years ago. And I have no experience crocheting with it. It's a bit stiff to work with and the overall look is mixed. Some areas nicely show the width of the ribbon and some areas, particularly chains, squeeze and twist it so you can't even see that it is a ribbon yarn. I decided not to worry about what the yarn was doing and focus on getting the stitches right.


The pattern I started with was "Bonsai Shawl" by Marty Miller in Interweave Crochet Accessories Special Issue 2011, pg. 127. After completing rows 1 and 2 to get the top edge established, I modified the pattern by changing all the single crochet stitches to double crochet stitches to make the shawl larger and airier. 

Here's the shawl on the blocking boards. Based on the fiber content, I'm not sure what blocking will accomplish, but I thought I'd give it a try anyway. The odd lines are yarn tails that I have woven in but not yet trimmed off. I like to do the final cut of tails after blocking in case there's any shrinking or stretching that might affect them. Stretched out, the shawl is approximately 47" by 41" by 41" or 120 cm by 104 cm by 104 cm.


After I finished the body of the shawl, I was pretty pleased with the outcome. However, I remembered that I had already registered my entry as a "crocheted shawl with beads" ... so where were the beads? I suppose I could have ignored the "with beads" and just submitted the shawl as is, but what if that threw the piece out of the competition? (It's hard to outguess the judges on how picky -- and overly judgmental -- they will be. Next year, I'll try to be less specific with my entry descriptions in case I have to make a last minute change.)

So I decided that some beads were needed and started rummaging in my stash. I would need about 55 beads, and they had to be (1) large enough for the yarn to fit through their holes, and (2) able to compete with the busyness of the yarn and not get lost in the piece. I had about 60 of these metallic-colored beads which looked like they meet the criteria. I strung all the beads on the yarn and attached them to the shawl by a series of chain stitches along the edge of the shawl. 

One of the things I liked about the original pattern was the points on the shawl edges. Unfortunately, these were rather lost in the application of the beaded edging, but the alternative would have been to start over and incorporate the beads as I crocheted...and I was able to talk myself out of that pretty quickly.


All that's left now is to wait till the shawl is dry and to snip off the remainders of the yarn tails. I'm not sure I'd ever wear the piece, but it was an interesting challenge to crochet with ribbon yarn at least one time. Although I have a couple of balls left, I don't want to do anything with this yarn again. I plan to donate what's left to my knitting group. It's always fun to see what other knitters do with yarn that I no longer like.

Thursday, September 10, 2015

2015 State Fair Projects: Tatted Edging on Metal Trivet


This is proof that I will tat onto practically anything. I've been tatting onto paper shapes for sometime now so when I saw this white enameled metal trivet in an area store I thought, "That looks like something else I could tat on." I started the project just for fun and joked to tatting buddies that I should enter it into the State Fair, thinking that, of course, there was no category for adding lace to metal trivets. However, when the premium books came out with the categories and rules, it turns out that I could enter the piece. There is a special category called the Home Furnishings "Almost Anything Goes" Contest. So I had a category and an incentive to finish the project.

I used size 20 Lizbeth thread in colorway 165 "Grape Splash." The edging is tatted directly into the holes on the trivet. There are three rounds in the piece. 
Round 1: 
    all rings:  5ds p 5ds p 5ds attach to trivet 5ds p 5ds p 5ds cls rw
    all chains: 5ds p 5 ds
Round 2 is the same except rings are attached to the picot on round 1 chains instead of the trivet.
Round 3 is all chains: 2 ds p 2ds p 2ds p 2ds p 2 ds p 2ds then lock-joined to the picot on a Round 2 chain.

Below is a closeup of the tatted edging. The end result gives the piece a ruffled effect reminiscent of old fashioned doilies.


This isn't the first metal piece that I've tatted onto, but it is the largest. The trivet is 8 inches across, and, with the tatted edging, 10 inches across. 


Sunday, August 30, 2015

And Now We Are Three...


Back in July 2014, I knitted and felted two fish using a Fiber Space pattern. I gave them to my daughter who planned to hang them in her house. Her plan was to make a mobile with them, but she thought that it would work out better with three fish. So I've just finished making her a third fish. The original two fish were made using wool from the pattern kit. This third one is a little different because I used Lite Lopi wool yarn. I think it felts up denser because the yarn has such a loose twist. But the effect is still quite cute.


A trip through the jewelry department of our local Belk store snagged her a marked-down necklace of clear plastic beads in graduated sizes. She plans to use these as "bubbles" coming out of the fishes' mouths. I'll post a photo of her finished project. 

Monday, August 24, 2015

2015 State Fair Projects: Tatted Pillowcase Edging, Finally Finished!


Finally finished the tatted pillowcase edging I plan to enter into the 2015 North Carolina State Fair. 

The pattern is based on Pam Palmer's "Down the Garden Path" from her book Tatting Treats Three. The original pattern has more picots on the vines and flowers with 5 rings instead of the 6 in my version. 

The threads are all size 20 Lizbeth thread. The variegated green vines are colorway #138 "Leafy Green." The flowers are all odds and ends of variegated threads that I had left over from other projects. Other materials I used were green sewing thread to secure the vines and clear nylon thread to sew down all the flowers.

The tatting was finished in late July, but I was left with the labor of attaching it to the pillowcase. As you can see from the photograph below, there were a lot of loose ends that needed to be dealt with.


One of my options would be to pull the ends through to the inside of the pillowcase and knot them securely. But I was afraid that the untidiness of that solution would count against me in the judging, and my tatting buddies agreed that it wasn't a good idea. 

I decided that if I opened up the hem of the pillowcase and pulled the loose ends through and knotted them securely, I could hide all the messiness from view while making sure that everything stayed in place. This is important to me because I actually use and launder the pillowcases I embellish with tatting. That's why I spend a lot of time sewing the lace down so everything will stay in place with years of use.

I sewed down all the tatting, using green sewing thread that matched the green vines and clear nylon thread on all the flowers since matching the colors in all the flowers would have been practically impossible.


Once everything was tacked down securely, I sewed the hem back together on my sewing machine (yay, no more hand sewing).

Here's one side of the final result:


All that's left now to get the entry ready is to wash and press the pillowcase. Of all the fair entries I've been working on, this one was definitely the most labor intensive, with attaching the tatting taking almost as much time as the actual tatting. I hope all the work pays off and impresses the judges.

Tuesday, August 11, 2015

Patience...

My response to people watching me tat who say, "I wouldn't have the patience to do what you do" --

And you can say the same for any other kind of handwork: knitting, crocheting, stitching, weaving, wood carving, pottery making, etc.


Saturday, August 8, 2015

2015 State Fair Projects: Knitted Edging for a Hand Towel


I just completed another entry for the State Fair: a knitted edging for a hand towel. This one will be entered in the Home Furnishings category "Edging or insertion for linens attached to appropriate household linen."

For this entry I used a commercially-appliqued cotton hand towel and size 10 Aunt Lydia's Classic Crochet Thread in colorway "Ocean."

I used a size 0 circular bamboo needle for this project. I like the way that bamboo holds onto the thread and keeps stitches from slipping off. Most of my tiny knitting needles are metal, which I prefer to use in larger sizes, but for thread projects the metal allows stitches to too easily slide off. I usually don't like the bamboo for its greater "grabbiness" for most yarn projects, but that quality works well for knitting thread and for projects calling for double-pointed needles.

The pattern is my variation of "Pattern 137" from Classic Knitted Cotton Edgings by Furze Hewitt and Billie Daley (Kangaroo Press, 1990 edition; p. 78). The pattern is a 12-row repeat that works up fast in all knit stitches. The only thing I changed was to knit the triangles in a stockinette, rather than a garter stitch pattern. I preferred the way this made that part of the edging stand out from the garter stitch heading and gave the triangles a smoother appearance.


After blocking, I hand-stitched the edging onto the towel boarder. Although it might not be evident from the photos, I think the colors in the thread are similar to the colors used in the appliques so the edging makes a nice complement to the towel.


Thursday, August 6, 2015

2015 State Fair Projects: Framed Tatted Piece


One of the categories I can enter tatting in at the North Carolina State Fair is "Bobbin Lace, Tatting, framed or mounted." I've been attaching tatting to non-fabric pieces and thought that technique might make an interesting entry. I  tatted on and framed a metal bookmark a while back, but it was too long ago to enter it in this year's fair. All entries have to be completed in the year of entry even if they were started years earlier. I have a few metal pieces I could use and chose a sterling silver heart-shaped bookmark.

I decided to complement the silver piece with an edging in size 20 Lizbeth thread in color #605 Silver. The pattern is "Lace No. 11" from Tatted Handkerchiefs by Kirstine Nikolajsen and Inge Lise Nikolajsen (Akacia, 2002). One of the reasons I chose the pattern is that it is tatted in two rounds. This allowed me to set up a simpler base row attached directly to the bookmark so that I could figure out the number of repeats and spacing on the piece before doing the frillier, more complicated second row.


The finished piece was cupping quite a bit so I wet blocked the piece with water and spray starch over night. When it was dried, I opened up the picots by poking them with a small crochet hook. This also made the picots pretty much uniform in size. I finish all my pieces with picots this way rather than using a picot gauge. I can usually eyeball the size I want and then even out everything by stretching with the crochet hook. After that, I placed the piece under a stack of books to further flatten it.

The size of the piece is around 4" by 4" and I mounted it on a piece of black moiré fabric and placed it in an 8" by 8" black frame. The frame has an insert that allows you to create a shadowbox effect that sets the piece deep in the back of the frame.

Friday, July 31, 2015

Crocheting in the Library

Wednesday evening I participated in fiber demonstrations with the Twisted Threads Fiber Arts Guild by showing and demonstrating crochet at the Western Wake Regional Library in Cary, NC. The Guild does a series of demos in the summer at several of the libraries in Wake County to introduce children to fiber arts. Last year I showed knitting, but since there are fewer crocheters, I decided to volunteer to do that craft this year. In addition to several scarves and other items, I brought my LED doily which interested adults as well as the kids.

I crocheted and gave away some simple yarn hearts.


UPDATE 3/6/18: The link to the heart pattern that was originally in this post is no longer operable. So I am including the instructions for the hearts here:

chain 4, make all stitches in the first chain
3 treble crochet
3 double crochet
chain 1
1 treble crochet
chain 1
3 double crochet
3 treble crochet
chain 3
close with slip stitch
tie the 2 tails with a knot to secure

The hearts work up fast, making them an ideal project for demonstrations, and the kids loved getting them.

I had a great time, and tomorrow I'll be changing gears as one of Tri-Tatters' monthly tatting demonstrators at Mordecai Historic Park in Raleigh.