Saturday, March 25, 2017

Tatting at the 2017 Carolina Fiber Fest

Another opportunity to promote our love of tatting! Today the Tri-Tatters group displayed and demonstrated tatting at the 2017 Carolina Fiber Fest in Raleigh, NC. We had a grand time meeting with other tatters and tatter wannabes. Many of the people we talked with signed up for our mailing list, and we hope to see some of them at our monthly meetings.


Friday, March 24, 2017

Carolina Fiber Fest 2017

Once again I had a display of fiber arts at the Carolina Fiber Fest in Raleigh, NC. For the past 3 years I've demonstrated using non-traditional materials in fiber crafts, but after so many years, I was ready to try something different. I volunteered to display and demo crocheting if no local guild was available to do it...and my offer was accepted. Here are some photos of the display I set up.


This is the giant crocheted LED rope light doily that I made a few years ago. It's always an attention-getter when I take it to demos.


Here are some more items I brought including several that won ribbons at the NC State Fair.


It was a lot of fun meeting and talking with crocheters during the day. Many feel left out or overlooked because of the popularity of knitting so they were pleased to see that crochet was represented at the event. I've been asked to participate at the Twisted Threads Guild booth next year as they would like people to see that crochet is one of the crafts that they promote. It will be nice to be part of a larger group after being a solo demonstrator for so many years.


Monday, March 20, 2017

"Blinging" Tatting Shuttles

On International Tatting Day (April 1st) I will be leading a workshop, "Bling Your Shuttle," at the North Carolina Regional Lacers Spring Lace Day in Chapel Hill, NC. Participants will decorate tatting shuttles using a selection of origami papers and decoupage medium. To further inspire the tatters and give them ideas, I will also have a display of shuttles that I have decoupaged in various ways. The class should be a lot of fun for everyone.

I show here some of the examples that I plan to bring to the class along with comments on the process for each one.

This is one of my earliest efforts. The paper is origami paper on a Susan Bates plastic shuttle. Origami paper comes in a vast selection of patterns and lends itself well to decoupaging. The decoupage medium is Mod Podge Gloss.


Here's another shuttle decoupaged with origami paper, this time on a Handy Hands Moonlit shuttle. The addition of the hook means that care is needed to make sure the paper is secure on that end of the shuttle so thread doesn't catch on it when using the hook.


I've included this example to show that selection of paper is as important as careful decoupaging. This design came from the same pack of origami paper as the one above. But the design is so pale that is fades into the background. The shuttle is a Handy Hands Sunlit and the decoupaging was done with Mod Podge Gloss and finished with a couple of coats of Martha Stewart Crafts High Gloss Finish.


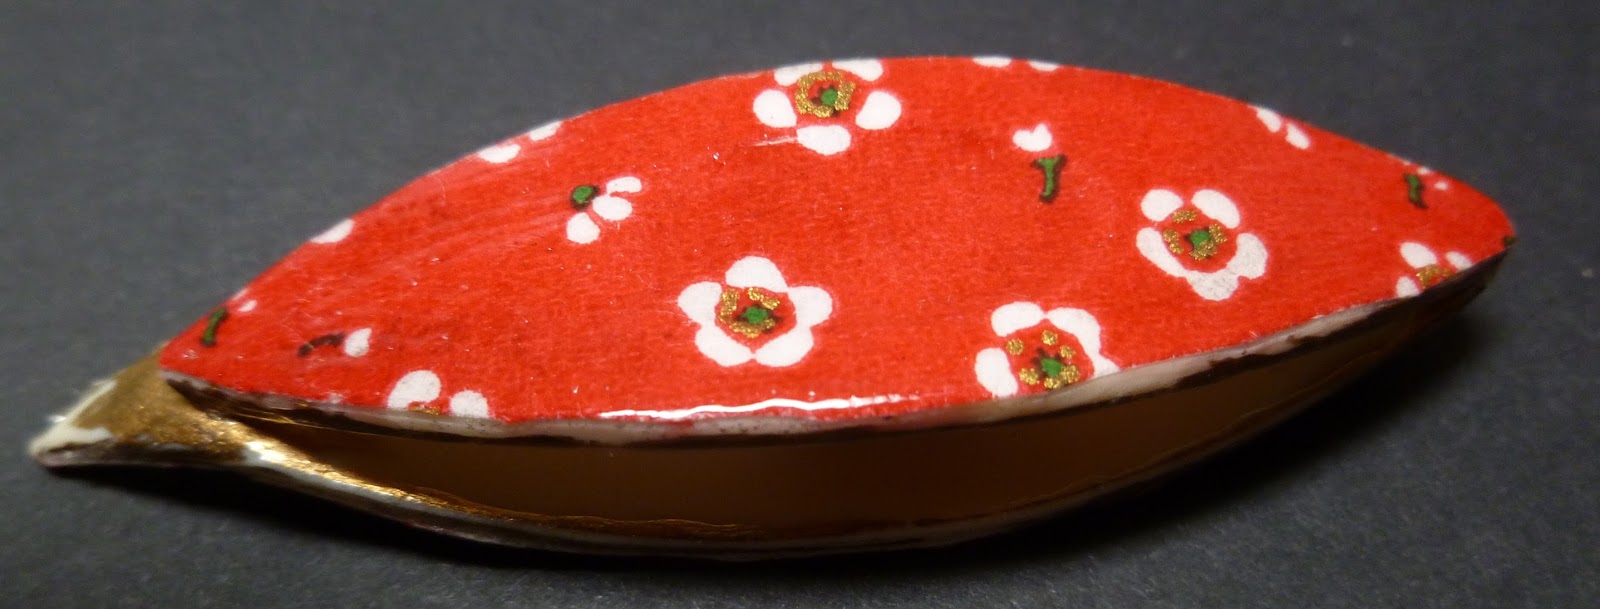
This is a Lacis Sew Mate shuttle decoupaged with paper a little heavier than origami paper. It's from a book of papers that simulate the effect of marblized paper. One thing to watch out for when using some printed papers is that part of the printing can rub off during the decoupaging process. You can see on the bottom left edge that this has happened in a small spot. Repeated coats of the decoupage medium can prevent this from spreading. Again, Mod Podge Gloss was the medium used.


Here's another Handy Hands Sunlit shuttle, but this time only Mod Podge Extreme Glitter was used to decorate it. So you can play around with various coatings and get some interesting effects without the addition of paper. 


Here's another Handy Hands Sunlit shuttle coated only with Mod Podge Extreme Glitter and and the addition of a little piece of tatting in size 80 thread. Not only is this a great way to show off your tatting, but the texture of the tatting provides a good grip on the shuttle.


Yet another Handy Hands Sunlit shuttle, but this time, instead of origami paper, I used a decorative  bag made of almost tissue thickness paper. The bag contained a souvenir from my daughter's trip to Italy so not only is the design a fun one to have on a shuttle, but it's also a reminder of my daughter's thoughtful gift. Using papers collected on trips (paper bags, paper napkins) is a nice way to create a useful remembrance. 


I usually only decorate the top side of my shuttles, but this Susan Bates shuttle is the exception. It is an example of a decorating failure and a rescue from that failure. I originally painted this shuttle with Martha Stewart Crafts Gold Liquid Gilding. I've had great success using this on a damaged wooden picture frame, but this was the first, and only, time I used it on plastic. It did not do well on this surface and the gilding rubbed off in an unsightly way. You can see some of the remains of the gilding on the underside of the tip in the bottom photo. I decided to cover the ugly with origami paper on both sides. I used Mod Podge Gloss to attach the paper and then several coats of Martha Stewart Crafts High Gloss Finish to give it even more shine.


Here I'm playing with little plastic stickers, the kind found in any scrapbooking department in craft stores. The Handy Hands Moonlit shuttle was first coated with Mod Podge Gloss and the sticker applied to the wet surface. After drying, several coats of Martha Stewart Crafts High Gloss Finish were added to give the surface a shine and to insure that the sticker would stay stuck.


Here's another attempt that taught me something. This Clover shuttle is decoupaged with silver metallic origami paper. I find that this paper can be more fragile than the non-metallic papers. During the decoupaging operation, some of the paper almost rubbed off as can be seen near the tip of the shuttle. I won't be using this type of paper again. I added another from my sticker stash and gave the shuttle many coats of Martha Stewart Crafts High Gloss Finish to protect the paper from further rubbing off and to make sure the sticker would not peel off.


Tuesday, March 7, 2017

Butterfly Magnets for Lace Day

For the past two years I have made magnets for the North Carolina Regional Lacers Spring Lace Day goody bags The first year I made heart shaped magnets and last year I used a star shape. Although each year I use a different design, the process is generally the same. This year's magnet is a butterfly. I just finished making 110 of these since we often have quite a number of registrants for the event.


The paper is Strathmore 300 Series Watercolor paper, a heavy stock with a slight pebbly surface. I used a paper punch to make the butterfly shapes and backed them with small squares of peel-and-stick magnets. Each piece is coated with Mod Podge Extreme Glitter decoupage medium and left to dry.

The thread is Lizbeth size 80 in colorway #155 "Ocean Sunset." Some of the butterflies have four tiny tatted rings and others have a cluster of three little tatted flowers made up of multi-picot rings. The pieces of tatting are glued to the paper shapes with more Mod Podge and the pieces are again left to dry.


After the second drying the tatting is given a top coat of Mod Podge Extreme Glitter to secure them  onto the paper and to add more sparkle. Now they're ready for the goody bags, and I'm already thinking about what shape I'll use to make next year's magnets.

Monday, March 6, 2017

Attaching Tatted Edging to Pillowcases

As a tatter, I mostly tat edgings that I apply to handkerchiefs and pillowcases. Typically, handkerchiefs, especially vintage hankies, are treated delicately when washed. Pillowcases are another matter. They are usually thrown in the wash along with the sheets and other household linens. Because of this, my method of attaching edgings to pillowcases involves two practices: (1) I always attach the edging a few inches from the pillowcase edge, and (2) I always sew down (usually by hand) both sides of the edging. The photos below show three methods of attaching edgings to pillowcases and the results after years of washing in a top-loader washing machine.

Example 1: traditional attachment on the pillowcase edge


After years of being agitated in a washing machine, this hen-and-chicks edging has not only become detached from the pillowcase in several places, but the tatting itself has broken apart. At this point there is very little that can be done to salvage this edging.


Example 2: attaching the edging a few inches beyond the pillowcase edge and sewing down one side of the edging


Here's another hen-and-chicks edging that has held up quite well in many washes, but the unsecured side curls and bunches up after drying. Of course, one could simply iron the curly edge down, but do you really want to spend time ironing pillowcases instead of using the time for tatting?


Example 3: attaching the edging a few inches beyond the pillowcase edge and sewing down both sides of the edging--my method


This edging lies flat with no ironing needed, unlike Example 2, and doesn't take a beating in the washing machine unlike Example 1. Yes, it does take twice as long to attach the edging using this method, but the results are literally years of enjoying using your beautiful tatting without having to hand wash it.