Tuesday, April 25, 2017

Blinging Shuttles Continued: Printing Your Own Decorative Paper

During the class on embellishing tatting shuttles and in discussions later with attendees, two ideas came up which I decided to explore.

Idea 1:  Shuttles decorated with Scottish tartan patterns were sold in the 1800s as souvenirs and are now highly collectible. I got into a discussion with my tatting friend Anitra about how it would be fun to find authentic tartan patterns and use them to make our own tartan shuttles.

Idea 2: So if we did find photos of tartans that we wanted to use and if we then printed them using an inkjet printer, would the printed result hold up to multiple coats of decoupage medium or would the ink run, thus ruining the pattern?

There are several books that provide illustrations of the clan tartans, and I suspected, rightly, that I could find many more from online sources. One of the sources I use to search for designs is Spoonflower, a company that is just down the road from me in Durham, NC. Spoonflower allows designers to submit their work and then prints on-demand custom textiles and papers for their customers.

You can search their database for designs by color or by topic. My search using the term "tartan" resulted in 35 screens of designs, probably more than I could possibly find in any book of patterns.

Using a program to capture an image from the computer screen, I saved a sample tartan to a file which I then printed on my inkjet printer at the highest resolution. Once I had the image on paper, I treated it just as I did the origami paper that I usually use. I am pleased to say that even with multiple coats of Mod Podge and Martha Stewart Crafts High Gloss finish, the printer ink did not run or smear.

Here's the final result, Royal Stewart tartan on a Clover tatting shuttle:


Thursday, April 6, 2017

More Shuttle "Blinging" Lessons

The tatters who signed up for my "Bling Your Shuttle" class this month were not the only ones who learned new things. I have been working on embellishing plastic shuttles with thicker plastic stickers but finding it tricky to get them to stay on. One of the scrapbookers in the class suggested I first apply a paper layer to the shuttle and then put the stickers onto the paper for firmer adhesion. I'm happy to say that her suggestion does work better when using these stickers. The pink shuttle is my first attemp at applying the stickers directly onto the shuttle, while I first applied purple origami paper to the shuttle on the left before putting on stickers.

For both shuttles I put many, many coats of Martha Stewart Crafts High Gloss Finish to get a nice finish. I'd like to experiment with other glossy finishes so I've been looking for other products in craft stores. It turns out that Mod Podge does make a finish that it says will give a glass-like finish to pieces. However, according to the directions on the bottle the drying/curing time is FOUR WEEKS! I think I'll stick with the Martha Stewart product for now.


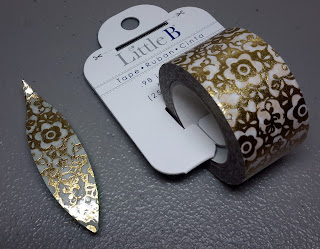
Another suggestion I got from the class is to use washi tape instead of sheets of origami paper. Most of the washi tape I found in craft stores is too narrow to cover my shuttles, but I did find this decorative tape that is wide enough. Like the plastic stickers it has a tendency to peel off too easily, but coats of the MS gloss, especially around the edges, seemed to fix the problem. The proof, of course, will come after I use this shuttle for tatting projects.


Saturday, April 1, 2017

"Blinging" Shuttles Class a Great Success!

I'm so proud of how well everyone's shuttles turned out at the "Bling Your Shuttles" workshop that I taught at the North Carolina Regional Lacers Spring Lace Day held today on International Tatting Day. Everyone was able to get the 1st coats on 2 shuttles before the end of class. And I got some ideas for new things to try on shuttles from the scrapbookers in attendance.

Here are some of the beautiful results from the class: